Showing posts with label in the kitchen. Show all posts

An Easy Treat: Yogurt Parfaits

My current food obsession is a nice, generously portioned yogurt parfait. The other day I had one for breakfast which I assembled at work with ingredients from home and for lunch I bought one from a cafe at work. My parfait at breakfast was a very simple, 3-ingredient parfait, but the one I had for lunch actually had finely sliced melon and pineapple in the mix. Quite unexpected but actually very refreshing.

The beauty of a yogurt parfait is that is can be made super fast by dumping everything into a bowl and eating on a regular day, or it can become a beautiful addition to a foodscape at a bridal or baby shower by artfully layering the ingredients in a drinking glass (double or highball), glass bowl, or traditional parfait glass.

Here are the yogurt parfaits I made for my sisters bridal shower last summer.


Ready to make your own yogurt parfaits? Just pick up some of your favorite yogurt, granola, and fruit(s). Gather some glasses or bowls and you're off!


My sister got me into the habit of washing my fruit, and if I were a responsible adult, all of my vegetables. Just add a spritz of this wash on the berries in a bowl, let them sit for about 20 seconds and then rinse and dry. Clean and fresh and ready to mingle with the other ingredients.


For the first layer, I added a generous layer of granola (I LOVE this granola--Stop and Shop brand).


The granola layer was followed up with a layer of yogurt and then blueberries (go ahead and mix your berries and/or melon if you're using a variety).


Next up is another layer of yogurt. For the top, I added a thin layer of granola followed by more blueberries.


As you can tell from the image above, the yogurt clearly ran down through the fruit layer, so to avoid this, I would be sure to add more fruit, especially around the perimeter of the glass.

And now for another view of the beautiful final product I made for my sisters bridal shower last year...


If you will be serving this at a party and want to make this super quick and easy treat in advance, I would suggest skipping the bottom layer of granola so it does not get mushy (I followed this rule for my sisters shower). Add the granola topping and berries/melon shortly before the party starts to ensure that the granola is nice and crunchy. Guests will love it.

Should this become part of your morning breakfast routine or an afternoon snack, you can do what I do and throw everything into a bowl, mix it all together and enjoy! No need to be fancy.

What's better? This is very filling!

Enjoy!

-Kristin

Chocolate Zucchini Bread

What's tastier than a chocolate cupcake? A chocolate zucchini bread muffin or loaf! It might actually be moister too!

I picked up a few zucchini's at a farmers market at my work, and knew exactly how I was going to put them to use. Park of me even wonders if it's really muffin-y or bread-y as it is super fluffy and moist and not dense or crumby in the least.

I've had this chocolate zucchini bread recipe on hand for several years now, and it's always been a hit.

 Chocolate Zucchini Bread

2 1/3 cups all-purpose flour
2 cups granulated sugar
1 tsp salt
1 tsp ground cinnamon
2 tsp baking soda
1/4 tsp baking powder
1/2 cup unsweetened cocoa powder
1/2 cup chopped walnuts (optional)
1/2 cup chocolate chips
3 large eggs
1 cup vegetable oil
2 tsp vanilla extract
3 cups unpeeled, grated zucchini (~3 medium size zucchini)


Preheat oven to 350 degrees. Lightly grease two 8x4" loaf pans.

In a large bowl combine the flour, sugar, cinnamon, baking soda, baking powder, cocoa powder, walnuts (if you choose), and chocolate chips.

In a medium bowl, lightly whisk the eggs then whisk in the vegetable oil and vanilla extract. Stir in grated zucchini.

Add wet ingredients into dry ingredient and mix thoroughly.

Pour batter into loaf pans and bake  for approximately 50-55 minutes. Place a toothpick or tester into loaf, and if it comes out clean the bread is ready.


Tips and Tricks

I chose to make one loaf and 12 muffins and used almost all of the batter. I baked the muffins for approximately 20 minutes (they will take more time than a cupcake). I also considered making this in a bundt pan, but that would have take longer to bake than I wanted to wait (approximately 75 minutes aka 15 minutes too long).

Another good way to determine if a loaf, muffin, cake or cupcake is fully cooked is to gently press your fingertip on its top. If it feels firm and rises back up where you pressed down, it is done. If it does not rise back up, your fingertip essentially goes through it, and/or if feels mushy, it is not done. If you gently move the loaf pan and it jiggles, it is not done. 

For garnish, I used confectioners (powdered) sugar; however, be warned, that it does eventually disappear! 


There's only so much grilled and steamed zucchini one can consume in a season. If you are growing zucchini in your garden this summer, or picking some up at a local farmers market or grocery store, be sure to give this recipe a try!

Enjoy!

-Kristin

*note: source for recipe unknown

In the Kitchen: Chocolate Dipped Coconut Macaroons

This is the first macaroon recipe I have ever tried. I'm pretty sure it will also be the last because these macaroons turned out absolutely delicious. Many who tried them would agree (someone even said they tasted like they came from a bakery).

The thought of preparing macaroons, for some odd reason, always seemed a bit intimidating, and I really don't know why. It was actually one of the easiest things I have ever baked! I found this macaroon recipe from Jen at Migonis Home. While she has a great post, I thought I would show everyone the steps that I took to prepare these treats.

To start, here is the recipe:

Chocolate Dipped Coconut Macaroons

2/3 cup flour
5 1/2 cups flaked coconut
1/4 tsp salt
1 (14 oz) can sweetened condensed milk
2 tsp vanilla extract
1 bag chocolate chips

Preheat oven to 350 degrees. Use a non-stick baking sheet or line a baking sheet with parchment paper (oven friendly). 

In a large bowl, combine coconut flakes, flour and salt. 


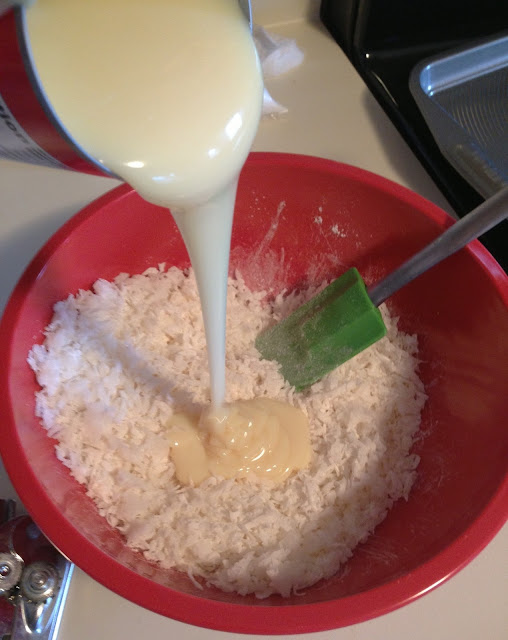
Then add in sweetened condensed milk and vanilla extract and mix until well combined either by hand or using a sturdy spoon or spatula. 


Form into 2" balls and place on the baking sheet. 


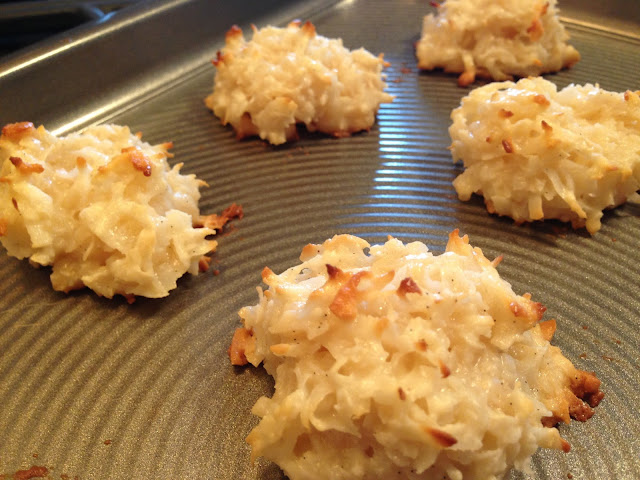
Bake for 12-15 minutes, or until the coconut begins to turn a golden brown.


Once cooled, melt the chocolate chips and get creative. You can dip the macaroons anyway you choose. 


I chose to dip the bottoms of the macaroons. 

So pretty

---

A few things to note: I used slightly less coconut since I only used the contents of one package of flaked coconut (5 1/3 cups); I used vanilla paste instead of extract which is slightly thicker which is why you see black flecks in the macaroons; because my baking sheets are non-stick (Circulon = AMAZING) I did not line them; I used Ghiradelli milk chocolate chips and melted them in a glass loaf pan in the oven since I haven't installed my microwave; to allow the chocolate to solidify, I placed them on a cooling rack lined with parchment paper and placed them in the freezer for about 15 minutes, then left them out on the counter to completely solidify.

In total, this recipe made a total of 18 macaroons. The total initial prep time was between 5 and 10 minutes and it took about 20 minutes to dip the macaroons in chocolate. I placed them in a bowl as opposed to laying them out on a platter just to be different. Jen packaged them very nicely and presented them as a gift. These, my friends, are indeed gift worthy. 

Not one morsel of macaroon remains thanks to the help of some friends and family!

-Kristin