At Home: Shower Inlay Reveal

Another item to check off the ol' to-do list for the full bathroom remodel: the glass and stone mosaic tile inlay in the shower.

Let's get ready for a play by play on the process with plenty of photos to keep you on your toes looking for more....

To start, I placed blue painters tape around the entire area where I wanted to remove tile and add in the inlay. It worked out quite nicely that my shower had 14 tiles from end to end, so I chose to make the inlay the width of 4 tiles leaving 5 tiles on each side. I chose not to tear out all of the white tile because it is in good shape, is neutral in color, and last but not least, it's too expensive to buy new tile for the entire shower right now (I priced out a few options and it was several hundred dollars at minimum).

My dad and my uncle came by to lend me a helping hand after numerous unsuccessful attempts at removing the tile myself. As you can see, several systems were in place to remove this tile including a hammer, a crowbar, and the Dremel with the grout cutter attachment.

It was tough to get the first tile out, but once we (um, he) got it out, it got much easier to get behind the other tiles and give it a few taps with the bar and hammer. The Dremel was especially helpful in the grout lines that separated the tile that was coming down with the tile that was staying. I really wanted to avoid any unfortunate mishaps.

After about 25 minutes, we made it to the top!


Here she is, completely exposed and ready to be prettified.


Once my dad and uncle parted ways I headed right into the bathroom and began tiling. No, I did not really scrape away all of the remains. Was that the right thing to do? Probably not. This lady does not want to waste a minute of time, and that is not always a fantastic thing. It turned out fine, and if there were any significant signs of unevenness, I took care of it. In the end, the mastic leveled itself out.

Now comes the part where I've learned a lesson, and I hope that you take my experience and learn from this as well. Tile installation. It's not that it's difficult or requires special certification. I actually find it quite easy, therapeutic and fun. I just didn't really think strategically about its placement in such a small place. Tile installation, I learned, requires strategy. 

My plan was to install as many full sheets of tile as I could, and I did this by starting in the bottom left corner with a trowel that was 3/16 in size (the smaller the tile, the smaller the size and spacing of the notches on the trowel). If you are using the correct size trowel, you shouldn't find that you are putting too much on. I got a decent amount on the trowel, applied it to the wall, and went from left to right, and and down, several times in the same area to ensure that it was even. 

Also note that I did not apply mastic to areas of the wall that were beyond what I could manage at a single time. It wasn't much more work to apply it 1-2 tile lengths at a time.


Note that I used a level to ensure that the sheet of tile was straight before moving on to the next sheet.


I placed all of the full sheets straight up the left hand side.


Then I had to fill in the sides with tile from the remaining tile sheets. One by one.


See what is happening about 2/3 of the way in from the left at the bottom? A vertical line had formed between the full sheets of tile and all of the tile that I had to individually place in the inlay. Yes, I could have moved around the full sheets, except for that fact that it was too late. I did the full sheets one night, and began filling in the next night. The mastic was dry.

Here is what I think I should have done when laying out the sheets of tile (this is not drawn to scale; I actually got 5 full sheets from top to bottom). Something that I believe the fine gentleman employee at Home Depot may have been discreetly suggesting:


A few people didn't notice it until I mentioned it, but I feel like the left side is choppy with all the small tile, and the right side is choppy with the unintentional formation of a vertical line and similarly sized tile (my own fault for sticking so many of those in there) from top to bottom.


Once I applied the grout it of course looked more finished, though the line still sticks out like a sore thumb to me. So, let's just focus on the pretty colors, then, shall we? Yes, the pretty colors you will surely find at the beach--seaglass, seagrass, the ocean, and rocks rushed ashore with the tide. Very pretty.


The final step was to seal the tile and grout. I had some sealer on hand from the kitchen backsplash I installed at my first condo. All I did was fill up a plastic cup with some sealer, used a foam sponge with  wooden handle (these can be found at home improvement and craft stores for very little money) to apply the sealer and then went to town covering the entire surface. I waited about 20 minutes to let it soak into the grout and the marble tile, and then I gently wiped it off with some paper towels (particularly the glass tile). I let it dry for about two days before getting it wet (I used trash bags and tape to cover the area).

I'm not a pro by any stretch of the definition, so I really can't say that perfection was or is to be expected. I think in the grand scheme of things it came out quite nice, and I enjoy looking at it peeking through my window panels turned shower curtain panels every day. It lends itself to the beginnings of what I hope to be a modified spa-like experience.

So, how did I get this all done? Well, with a little help from family and several tools and products.

WHAT YOU NEED

Removing the tile (if any)
Hammer
Crow bar or chisel
Dremel with grout attachment (if you have it or want to make the investment--it's pretty handy)
Vacuum
Safety glasses
Gloves
Drop cloth/old sheet

Applying the tile
Appropriate amount of tile to fill desired space (plus extra--I had about 3 sq ft or 3 sheets extra)
Mastic trowel (width and spacing of teeth contingent upon size of tile--mine was very small)
Mastic
Putty knife (for applying mastic to individual tiles)
Tile cutter (hand held) or saw
Gloves
Safety goggles (particularly when cutting/sawing)
Drop cloth/old sheet
Level
Razor blade (should you need to cut sheets of tile)

Grouting the tile
Grout
Bucket to mix grout
Grout float
Gloves
1-2 sponges for cleaning tile surface after grouting
Drop cloth/old sheet

Sealing the tile
Sealer
Cup
Foam sponge or rag
Dry rag or paper towels

I rocked the goggles, but I did not rock the gloves. I shed a lot of blood that night. Little teeny tiny shards of glass can cause some serious skin lesions. Believe me when I say this. Not to mention the very odd sensation in my hands after a long period of contact with the grout. No bueno. So, do yourself a favor and wear the gear.

COST BREAKDOWN

I had a lot of things on hand including the grout, trowel, putty knife, sealer, goggles, tile cutter, foam sponge, bucket, and grout float. I only needed to purchase the tile and the mastic. I ended up using about 8 sheets of tile for a total of cost $56 and the mastic was $20. Not a bad price for such an impact!

---

So, before I wrap up, let's take another peek at the final product using the ever-so-dramatic before and after.


Sadly, that contraption in the before picture was ultimately more of a hazard than a helper to me when entering and exiting the shower, so it was removed. I'm hopeful I won't need one of these bad boys for at least another 50 years.

If anyone else has done some tile work in their shower, please share some pictures. I'd love to see them! Also, if there is any feedback on how I could have better placed the tile, I am all ears.

-Kristin

It's Good to be Home

On Sunday I returned from a conference for work in Baltimore and a weekend with my sister and BIL since I was in the area.

I wanted to write this post because I'm sure many readers can relate. Upon my arrival home (aka Boston), I love how I felt when the plane touched ground at Logan Airport, how the city lights looked so pretty and comforting, how alive the Seaport area is becoming at each and every turn, how my short, two month long stint away from my neighborhood has validated how much I love it and how happy I am to be back, how friendly and kind my new neighbors are, how super delighted my cat was to see me, and how welcoming my new home was to me when I opened the front door. 

My home is nowhere near complete. It hasn't even been two months since the paperwork was signed, sealed and delivered. I literally have a toilet and bathroom vanity in my dining room. Not to mention that my dad was hard at work last weekend ripping out my bathroom floor in preparation for the installation of my marble floor (fingers crossed for this weekend).


And here is the contents of my bathroom floor. All bundled up in the confines of this 5 gallon bucket that continues to take up real estate in my bathroom.


My second bedroom continues to be the stage for my mapped out marble floor, the placeholder for a few extra dressers, and a bunch of other stuff that hasn't fallen into a category that is currently of enough interest to me to actually deal with in a timely manner.


But I really, truly love my home. The yet-to-be-unpacked boxes that remain shoved in closets and corners, the ladder laying across my living room floor. Oh, and there between the sofa and the end table rests the builder grade mirror from my half bath. Scratchy post, anyone? and it is possible to make these an attractive home decor gem???

I just got notification that the two accent chairs I ordered to fill the bay window space where the chair below sits are on their way and should be arriving on Friday. The moroccan style rug that you see is also a new addition. It was ordered at the same time as the chairs, all from Joss and Main.


Lorelai also landed on some pretty sweet real estate too. She's got two full windows to accommodate all of her daytime bird and rodent watching and plenty of space to support her scratching and napping needs. And of course there's the faux wood and brass ceiling fan. It's mine, baby! And I LOVE it!!!


There's no greater feeling than walking into your own home and experiencing a feeling that I can only describe as this relieving sense that the weight of the world is lifting off your shoulders and you can actually breath, even for a little while. A place to relax and be who you are. To do whatever you want including eating cereal for dinner or dessert before dinner or dessert for dinner. No one is judging. To live in a place that is a personal, unique expression of you. Is there anything better than that?

-Kristin

Entertaining: Semi-Homemade Affair

The past few weeks have been quite busy! My time was spent planning, purchasing, and preparing for the surprise party my sister and I were hosting for our dad's 50th birthday as well as our parent's 30th anniversary. My sister wanted to make everything (or at least, semi-homemade), and I went along with it. Sometimes it's just nice to give, have, and be a part of something that takes a lot of time, thought, and energy. Our parents definitely deserve it!

The tropical themed party was located at my parents house on a Saturday night from 7:00 to 10: 00 p.m. so my sister and I went with a variety of hot and cold colorful appetizers and several desserts, many of which incorporated coconut. We were expecting approximately 50 to 60 guests. Here is the menu we prepared:

Appetizers

Bruchetta
Caprese on a stick
Cheesey triangles
Coconut shrimp
Crudites
Fruit skewers
Garden salad
Individual layered mexican dip
Pigs in a blanket
Pizza bites
Tomato, basil, and mozzarella pasta

Desserts

Angel lush cake with pineapple
Chocolate coconut bars
Chocolate cupcakes with chocolate butter cream frosting
Coconut cupcakes with cream cheese frosting
Lemon cupcakes with lemon butter cream frosting
Three-tiered yellow cake with butter cream frosting

Beverages

Assorted bottled beers
Frozen Georgia peach
Malibu and Diet Coke
Tropical punch (non-alcoholic)
Tropical sangria

The only food that was not semi-homemade were the pizza bites. We used Frechetta's flatbread pizzas in both cheese and meat lovers. Everything else was a compilation of store bought items paired with something homemade. 

By word of our guests, everything turned out delish! Since my sister and I were hanging out around the oven for the better part of the evening, we didn't get to eat much. I snuck in a layered dip or two and those are nearly impossibly to screw up and they were pretty tasty. The most popular apps were the pigs in a blanket, the pizza bites, and the cheesey triangles made by my BIL, Nick (props!).

Unfortunately, I didn't have much time to take pictures the day before or of the party since we were going non-stop for about 48 hours. But here is what I did have a few seconds to capture...

Pigs in a blanket ready to be baked

Fresh fruit skewers

Homemade 3-layer yellow cake with butter cream frosting

Cupcakes and cake on the buffet

If you would like the recipes for any of these appetizers or desserts just let me know! I am happy to share. 

I should also note that I have been asked to make the coconut cupcakes and the chocolate cupcakes for someone's birthday/Easter festivities this coming weekend! They were really that good!

-Kristin

In the Kitchen: Chocolate Dipped Coconut Macaroons

This is the first macaroon recipe I have ever tried. I'm pretty sure it will also be the last because these macaroons turned out absolutely delicious. Many who tried them would agree (someone even said they tasted like they came from a bakery).

The thought of preparing macaroons, for some odd reason, always seemed a bit intimidating, and I really don't know why. It was actually one of the easiest things I have ever baked! I found this macaroon recipe from Jen at Migonis Home. While she has a great post, I thought I would show everyone the steps that I took to prepare these treats.

To start, here is the recipe:

Chocolate Dipped Coconut Macaroons

2/3 cup flour
5 1/2 cups flaked coconut
1/4 tsp salt
1 (14 oz) can sweetened condensed milk
2 tsp vanilla extract
1 bag chocolate chips

Preheat oven to 350 degrees. Use a non-stick baking sheet or line a baking sheet with parchment paper (oven friendly). 

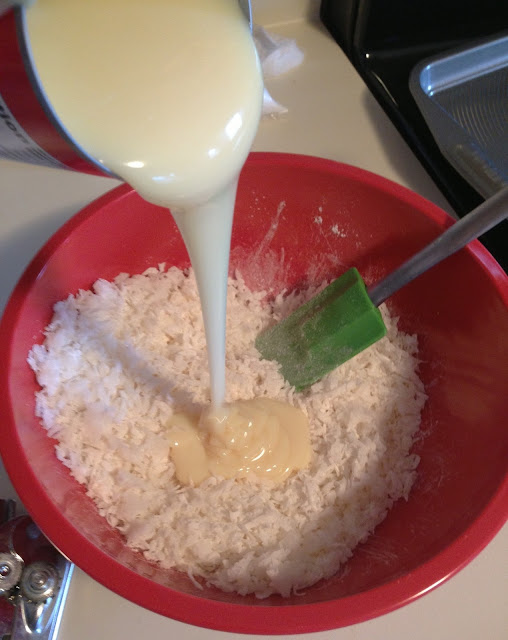
In a large bowl, combine coconut flakes, flour and salt. 


Then add in sweetened condensed milk and vanilla extract and mix until well combined either by hand or using a sturdy spoon or spatula. 


Form into 2" balls and place on the baking sheet. 


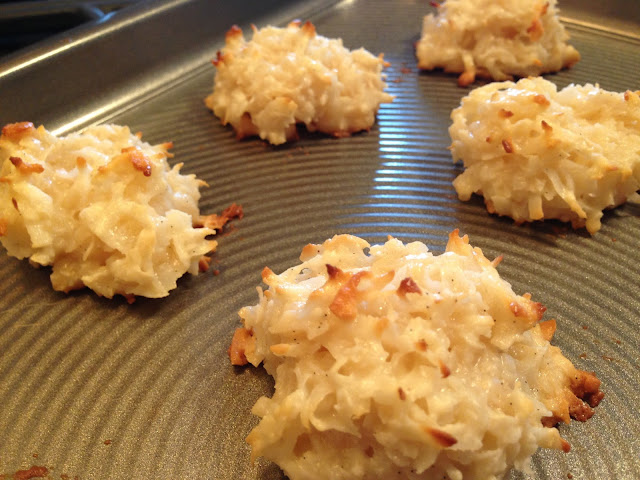
Bake for 12-15 minutes, or until the coconut begins to turn a golden brown.


Once cooled, melt the chocolate chips and get creative. You can dip the macaroons anyway you choose. 


I chose to dip the bottoms of the macaroons. 

So pretty

---

A few things to note: I used slightly less coconut since I only used the contents of one package of flaked coconut (5 1/3 cups); I used vanilla paste instead of extract which is slightly thicker which is why you see black flecks in the macaroons; because my baking sheets are non-stick (Circulon = AMAZING) I did not line them; I used Ghiradelli milk chocolate chips and melted them in a glass loaf pan in the oven since I haven't installed my microwave; to allow the chocolate to solidify, I placed them on a cooling rack lined with parchment paper and placed them in the freezer for about 15 minutes, then left them out on the counter to completely solidify.

In total, this recipe made a total of 18 macaroons. The total initial prep time was between 5 and 10 minutes and it took about 20 minutes to dip the macaroons in chocolate. I placed them in a bowl as opposed to laying them out on a platter just to be different. Jen packaged them very nicely and presented them as a gift. These, my friends, are indeed gift worthy. 

Not one morsel of macaroon remains thanks to the help of some friends and family!

-Kristin

At Home: Bathroom Board

As the renovations in my full bathroom slowly progress, I wanted to share a board of all of the items that will be incorporated into this small, just under 5x8' space. 

I wanted to subtly bring in a coastal vibe since I'm close to the beach and I find it relaxing, so I decided to achieve this look through color and accessories. 


I haven't decided on the exact paint color for the walls, but I picked the two colors on the board based on their appearance online. After trial and error, I will definitely be purchasing samples of these two colors to be sure I like one of them before investing in a whole gallon. For curiosity's sake, I went ahead and purchased samples of Pewter Tray by Behr (a recommendation from a friend) and Lime Light by Glidden last night. After testing them out on two walls in the bathroom, I found that Pewter Tray was too dark for the look I am after and Lime Light looks too icy/baby blue.

For the hardware, I am mixing metals! The faucet is a polished nickel, the towel bar and toilet paper holder are an oil rubbed bronze, and the curved shower curtain rod (not shown) is dark oil rubbed bronze/black. I might keep the shower head, faucet, and dial (I may have just made this word up to describe the device that turns on the shower) since I don't want to rip out the shower wall and that is polished chrome.

It's hard to tell from the image of the mosaic tile, but the colors include a seaglass green-blue, ocean blue, seagrass green and white and gray veined marble tile. The marble in the mosaic coordinates nicely with the marble floor (see my post on laying out the marble tile to ensure an even distribution of primarily gray and primarily white tiles). 

---

The other day I completed the shower inlay using the above mosaic tile, so be sure to check back for the post on the entire process, from demo to sealing. You will also get a better image of the curtain panels that I hung and used as the shower curtain. I got this idea from Pinterest. It gives the bathroom a more formal, classy look, but the material and pattern of the panels keeps things from appearing too stuffy. Having the two panels flanking the shower also makes the room feel bigger since you get more visual space inside the shower.

Also, stay tuned for a post on the accessories that I will be using in this bathroom. 

-Kristin

Entertaining: Cousin's Christening

Is there a cuter color combo for a little girl than pink, brown and white? Is there? I don't think so!!!

My aunt, Annie, and her boyfriend, Doug, hosted a reception after their daughter McKenzie's christening on Sunday, and I just had to share some pictures. Annie had mentioned something a few months ago about putting together a candy stand for the party, but once I saw it in person, I couldn't stand how amazing it was. My other aunt Jodi is super talented in the craft department, and together they created a really beautiful display adorned with lots of pink textured and patterned ribbon.

(I know, I desperately need a good camera, and it doesn't start with an "iP...")


My aunt Jodi drew and cut out the letters by hand and glued the ribbon and bows on each container.
She seriously is so crafty.


These 2x2" favor boxes were super cute and filled with Hershey kisses. It was hard to tell even in person, but that is a brown box with white polka dots!


My aunt Annie filled these larger white boxes with candy and tied pink, brown and white balloons to them at each table. She also made up extra boxes so everyone could take their favorite candy home.


  A wardrobe change was in order for McKenzie from her lovely white gown to this super cute pink ruffled, polka dotted party dress with a coordinating pink cardigan.
The bow on the headband was about 2/3 the size of her head.


The candy stand was a huge hit for adults and kids alike. It definitely added some extra fun to the party!

-Kristin

At Home: Half Bath Update

Time for another project! This half bathroom is located right off of my kitchen. It's only as wide as the vanity (38" wide to be exact). The toilet is on the back wall of the bathroom and faces the vanity. 

I'm working with builder grade materials from 1991. I'll be honest, everything is in absolutely mint condition as there was only one owner and she was a meticulous elderly woman. 

I haven't planted my money trees yet, so I'm not able to replace the vanity and buy what would need to be a custom sized counter top (closest standard sizes are 37" and 43"), and I haven't come up with another solution yet. What I do know is that I don't like the look of tiled counter tops so that option is out.

And now for some before photos...


I decided to paint the vanity white to brighten up the space a bit. To start, I removed the doors from the vanity and then removed the hinges from the doors using a cordless powerdrill (a gift from my dad).


I applied two coats of Zinsser's cover stain with my Purdy paintbrush. I did not sand the cabinets but I did give them a good wipe down (my dad was not happy with my decision to neglect the sanding step). Sanding was not required and wiping down is of course a must for any paint job.


This vanity has evolved into my cleaning supply closet

I tried to use a small roller on the doors, but that just didn't work out as it left some weird dotty-ish roller marks.


After applying the two coats of cover stain, I lightly sanded the surface to smooth it out and remove some of the brush marks. Then I applied two coats of Behr's Premium Plus Ultra Ultra Pure White paint and primer in one to the vanity (I used this paint for the trim, baseboard, and door in my laundry room). 


Ah, yes! Notice that I forgot about the toe kick!!! I noticed that too about a day or two later. I didn't bother with applying the cover stain. I just put on two coats of the Behr paint since it's mostly out of sight. And also because I thought my house was going to blow up when painting the vanity because the scent that developed as a result of oil paint mixing with gas emitted from my range was rather unsettling ("Dad! My stove smells like it's burning!!!!! How do I turn the gas off?! It's going to blow up!!!!").

So, what's left to do now? Get the hinges back from my dad (who was going to spray paint them in an oil rubbed bronze finish), paint the walls, order and install new counter top (maybe formica since it's pretty cheap?), install new sink, install new faucet, install mosaic tile as backsplash, install new mirror above vanity, install new towel bar and toilet paper holder (ordered and received in oil rubbed bronze finish) and accessorize. Stayed tuned for the final reveal in the next few weeks.

-Kristin


At Home: Marble Floor Mapping

I finally purchased the flooring for my bathroom renovation. I chose to go with marble tile. A close contender was tile that has the look of wood flooring. A lot of the pins on my Bathroom board on Pinterest have marble floor. I just love the classic, sophisticated look. It's timeless. I've always wanted marble flooring, so I said, just do it!

Here are some of my favorite pins from my bathroom board:


Marble is definitely not the cheapest tile around. I explored big box stores, websites like overstock.com, amazon.com and wayfair.com, and local tile shops. It was really hard to justify spending $7+ on one square foot of tile.

Ultimately, I chose to go the big box store route, Home Depot. I purchased 12 cases (5 sq. ft/case) of these greecian polished marble tiles for $3.99/sq. ft. I needed a minimum of 45 sq. ft. but got extra should there have been significant variations in pattern. I'm glad I got more than I needed as it allowed me to be really picky about which tiles I chose.


There's a tag that says "Made in China" so, I hate to be so gullible to believe that these are real marble tile--or perhaps they are real marble but were cut and polished in China?! I'm not sure. You get what you pay for I suppose. Anyways, before I start to regret this decision, I'll continue....

So, as the post title reads, I placed each and every tile out on the floor of my spare room to get an idea of what I was working with. I thought I got a pretty good bunch, many with nice veining. I eliminated all the tile that I did not like (super spotty or too plain) or that looked like they were cracked (including on the back of the tile).


I organized the tiles into my first choice (red tag), second choice (blue tag), and third choice (no tag). Then I started moving the tiles into the bathroom to figure out where I wanted each tile to be placed. Because there are variations in the depth of gray and veining in each of the tiles, I wanted to be sure they were evenly distributed.


Once I determined the layout of the tile I put together a very official floor map on a post-it note. It's a bit too official to share online (or the picture just refused to upload).

I labeled the tiles by number from left to right, bottom to the top, for those that will be most visible in the room and then labeled a column by letter (those that are against the wall and behind the vanity and toilet; column on the right of picture below). Then I placed each tile back into the spare room using the numerical grid. This also allowed me to take another look at tile placement and rearrange if necessary.


I also put together a few tiles for the linen closet that is located behind the bathroom door.


It didn't really take all that long to lay everything out, sort and label, lay out again, label again, and lay out once more into a final configuration. I figure it will be much easier to have a tile pattern established on installation day rather than moving tiles around when wet cement is involved.

I ended up returning two boxes of tile (ten tiles total).

Super excited to have the tile ready to go. I also have a lovely new American Standard WaterSense certified toilet chillin' in the back of my car. Good times. The bathroom vanity I purchased is still at my parents house. Now I am in the process of pricing out tile for the shower and deciding whether or not to keep the white 4x4 tile that currently is in there and cutting out a small section for a mosaic inlay. Sort of like this:


Now I shall wait for my dad to free up a weekend so the bathroom renovation can begin. I'm hoping I can remain patient though, because removing tile doesn't seem that difficult to do on my own.....

Stay tuned!

-Kristin